Struts2+Spring+Hibernate是J2EE的最新流行框架。本篇是我搭建这个框架的经验总结,有很多人搭建这个框架总会遇到
大大小小的问题,网上也没有什么行之有效的方案或成体系的介绍,所以我就决定总结一下我的搭建过程。给一些搭
建尚存问题的朋友提供帮助。
我用这个框架,实现的是基本的CRUD功能的一个雇员管理系统,本来打算丰富一下功能,但是一直没能抽出空去搞。
目前版本暂定为1.0,除了CRUD外还配置了表单验证框架JSValidation。功能都能很顺利的实现。
现在分享部分源码,来说明一些注意事项。
以下是部分搭建过程及源码:
1.先组合实现Hibernate3.2+Spring2.5支持,删除hibernate.cfg.xml文件,修改applicationContext.xml文件的内容,增加SessionFactory和dataSource的设置。
2.通过MyEclipse的向导方式,生成POJO类和对应的映射文件。
3.修改applicationContext.xml文件中<property name="mappingResources">元素的内容。
4.编写DAO接口和实现类。
5.修改applicationContext.xml文件,增加对Dao实现类的配置。
6.组合Struts2和Spring2.5,修改web.xml文件,增加struts2的所需要的过滤器配置。
7.增加struts2相应类库,增加struts2与spring的配置jar包。
8.拷贝struts.xml文件到src根目录下,再修改struts.xml文件,进行常量配置。
9.修改web.xml文件,配置Spring监听器,和上下文变量。并增加OpenSessionInViewFilter的设置。
10.写入action类。
11.配置struts.xml文件。
12.修改applicationContext.xml
13.编写Jsp文件。
14.加载运行项目。
下面是关键文件的源码:
struts.xml源码:
<?xml version="1.0" encoding="UTF-8"?>
<!DOCTYPE struts PUBLIC
"-//Apache Software Foundation//DTD Struts Configuration 2.0//EN"
"http://struts.apache.org/dtds/struts-2.0.dtd">
<struts>
<!-- struts2委托spring管理 -->
<constant name="struts.objectFactory" value="spring"/>
<!-- /crm/emp/add.action -->
<package name="crm_employee" extends="struts-default" namespace="/emp">
<action name="add" class="addBean" method="add">
<result>add.action</result>
<result>/emp/add_suc.jsp</result>
</action>
<action name="list" class="listBean" method="list">
<result>/emp/list.jsp</result>
</action>
<action name="delete" class="deleteBean" method="delete">
<result>delete.action</result>
<result>/emp/delete_suc.jsp</result>
</action>
<action name="update" class="updateBean" method="update">
<result>update.action</result>
<result>/emp/edit_suc.jsp</result>
</action>
<action name="edit" class="editBean" method="edit">
<result>/emp/edit.jsp</result>
</action>
<!-- Add actions here -->
</package>
</struts>
web.xml源码:
<?xml version="1.0" encoding="UTF-8"?>
<web-app version="2.5" xmlns="http://java.sun.com/xml/ns/javaee"
xmlns:xsi="http://www.w3.org/2001/XMLSchema-instance"
xsi:schemaLocation="http://java.sun.com/xml/ns/javaee
http://java.sun.com/xml/ns/javaee/web-app_2_5.xsd">
<!-- 配置spring的监听器 -->
<context-param>
<param-name>contextConfigLocation</param-name>
<param-value>/WEB-INF/applicationContext*.xml</param-value>
</context-param>
<!-- 开启监听 -->
<listener>
<listener-class>
org.springframework.web.context.ContextLoaderListener
</listener-class>
</listener>
<!-- 配置OpenSessionInViewFilter,必须在struts2监听之前 -->
<filter>
<filter-name>lazyLoadingFilter</filter-name>
<filter-class>
org.springframework.orm.hibernate3.support.OpenSessionInViewFilter
</filter-class>
</filter>
<!-- 设置监听加载上下文 -->
<filter>
<filter-name>struts2</filter-name>
<filter-class>
org.apache.struts2.dispatcher.FilterDispatcher
</filter-class>
</filter>
<filter-mapping>
<filter-name>lazyLoadingFilter</filter-name>
<url-pattern>*.action</url-pattern>
</filter-mapping>
<filter-mapping>
<filter-name>struts2</filter-name>
<url-pattern>/*</url-pattern>
</filter-mapping>
<welcome-file-list>
<welcome-file>index.jsp</welcome-file>
</welcome-file-list>
</web-app>
applicationContext.xml源码:
<?xml version="1.0" encoding="UTF-8"?>
<beans xmlns="http://www.springframework.org/schema/beans"
xmlns:xsi="http://www.w3.org/2001/XMLSchema-instance"
xmlns:aop="http://www.springframework.org/schema/aop"
xmlns:tx="http://www.springframework.org/schema/tx"
xsi:schemaLocation="
http://www.springframework.org/schema/beans
http://www.springframework.org/schema/beans/spring-beans-2.5.xsd
http://www.springframework.org/schema/tx
http://www.springframework.org/schema/tx/spring-tx-2.0.xsd
http://www.springframework.org/schema/aop
http://www.springframework.org/schema/aop/spring-aop-2.0.xsd">
<!-- 配置Hibernate支持 -->
<bean id="dataSource"
class="org.apache.commons.dbcp.BasicDataSource">
<property name="driverClassName"
value="com.mysql.jdbc.Driver">
</property>
<property name="url"
value="jdbc:mysql://localhost:3306/tables">
</property>
<property name="username" value="root"></property>
<property name="password" value="hicc"></property>
</bean>
<bean id="sessionFactory"
class="org.springframework.orm.hibernate3.LocalSessionFactoryBean">
<property name="dataSource">
<ref bean="dataSource" />
</property>
<property name="hibernateProperties">
<props>
<prop key="hibernate.dialect">
org.hibernate.dialect.MySQLDialect
</prop>
<prop key="hibernate.show_sql">true</prop>
</props>
</property>
<property name="mappingResources">
<list>
<value>com/sy/crm/model/Employee.hbm.xml</value>
</list>
</property>
</bean>
<bean id="employeeDao"
class="com.sy.crm.dao.hibernate.EmployeeDaoHibernate">
<property name="sessionFactory">
<ref bean="sessionFactory" />
</property>
</bean>
<bean id="employeeManager"
class="com.sy.crm.service.impl.EmployeeManagerImpl">
<property name="employeeDao">
<ref bean="employeeDao" />
</property>
</bean>
<bean id="addBean" class="com.sy.crm.action.EmployeeAction" scope="prototype">
<property name="employeeManager">
<ref bean="employeeManager" />
</property>
</bean>
<bean id="listBean" class="com.sy.crm.action.EmployeeAction" scope="prototype">
<property name="employeeManager">
<ref bean="employeeManager" />
</property>
</bean>
<bean id="deleteBean" class="com.sy.crm.action.EmployeeAction" scope="prototype">
<property name="employeeManager">
<ref bean="employeeManager" />
</property>
</bean>
<bean id="updateBean" class="com.sy.crm.action.EmployeeAction" scope="prototype">
<property name="employeeManager">
<ref bean="employeeManager" />
</property>
</bean>
<bean id="editBean" class="com.sy.crm.action.EmployeeAction" scope="prototype">
<property name="employeeManager">
<ref bean="employeeManager" />
</property>
</bean>
<!-- 事务管理器 -->
<bean id="transactionManager"
class="org.springframework.orm.hibernate3.HibernateTransactionManager">
<property name="sessionFactory">
<ref local="sessionFactory"/>
</property>
</bean>
<!-- 配置事务特性,配置add,delete,update开始的方法,事务传播特性为required -->
<tx:advice id="txAdvice" transaction-manager="transactionManager">
<tx:attributes>
<tx:method name="add*" propagation="REQUIRED"/>
<tx:method name="delete*" propagation="REQUIRED"/>
<tx:method name="update*" propagation="REQUIRED"/>
<tx:method name="*" read-only="true"/>
</tx:attributes>
</tx:advice>
<!-- 配置那些类的方法进行事务管理,当前com.sy.crm.service包中的子包,
类中所有方法需要,还需要参考tx:advice的设置 -->
<aop:config>
<aop:pointcut id="allManagerMethod" expression="execution(*
com.sy.crm.service.*.*(..))"/>
<aop:advisor advice-ref="txAdvice" pointcut-ref="allManagerMethod"/>
</aop:config>
</beans>
add.jsp源码:
<%@ page language="java" pageEncoding="utf-8"%>
<%@ taglib uri="/struts-tags" prefix="s" %>
<!DOCTYPE HTML PUBLIC "-//W3C//DTD HTML 4.01 Transitional//EN">
<html>
<head>
<title>add page</title>
<script language="JavaScript" src="validation-framework.js"></script>
<meta http-equiv="pragma" content="no-cache">
<meta http-equiv="cache-control" content="no-cache">
<meta http-equiv="expires" content="0">
<meta http-equiv="keywords" content="keyword1,keyword2,keyword3">
<meta http-equiv="description" content="This is my page">
</head>
<body>
<center>
<h3>雇员注册:</h3><br>
<h4><a href="../emp/list.action">查看所有雇员</a></h4>
<div id="error" style="color:blue; font-weight:bold;"></div>
<s:form action="add" method="post" onsubmit="return doValidate('form')" name="form" id="form">
<s:textfield name="employee.name" label="姓名" id="name"/>
<s:textfield name="employee.address" label="地址"/>
<s:textfield name="employee.phone" label="电话"/>
<s:submit value="员工注册"/>
</s:form>
</center>
</body>
</html> list.jsp源码:
<%@ page language="java" pageEncoding="utf-8"%>
<%@ taglib uri="/struts-tags" prefix="s"%>
<!DOCTYPE HTML PUBLIC "-//W3C//DTD HTML 4.01 Transitional//EN">
<html>
<head>
<title>list employee page</title>
<meta http-equiv="pragma" content="no-cache">
<meta http-equiv="cache-control" content="no-cache">
<meta http-equiv="expires" content="0">
<meta http-equiv="keywords" content="keyword1,keyword2,keyword3">
<meta http-equiv="description" content="This is my page">
<style type="text/css">
table {
border: 1px solid black;
border-collapse: collapse;
}
table thead tr th {
border: 1px solid black;
padding: 3px;
background-color: #cccccc;
}
table tbody tr td {
border: 1px solid black;
padding: 3px;
}
</style>
</head>
<body>
<center>
<h3>
雇员管理:
</h3>
<br>
<h4>
<a href="../emp/add.jsp">员工注册</a>
</h4>
<s:form action="delete" theme="simple">
<table>
<thead>
<tr>
<th>
选择
</th>
<th>
编号
</th>
<th>
姓名
</th>
<th>
电话
</th>
<th>
地址
</th>
<th>
操作
</th>
</tr>
</thead>
<tbody>
<s:iterator value="employees">
<tr>
<td>
<input type="checkbox" name="id"
value='<s:property value="id" />' />
</td>
<td>
<s:property value="id" />
</td>
<td>
<s:property value="name" />
</td>
<td>
<s:property value="phone" />
</td>
<td>
<s:property value="address" />
</td>
<td>
<a
href='<s:url action="edit"><s:param name="id" value="id" /></s:url>'>
修改 </a>
<a
href='<s:url action="delete"><s:param name="id" value="id" /></s:url>'>
删除 </a>
</td>
</tr>
</s:iterator>
</tbody>
</table>
<s:submit value="delete" />
</s:form>
</center>
</body>
</html>
显示界面如图:
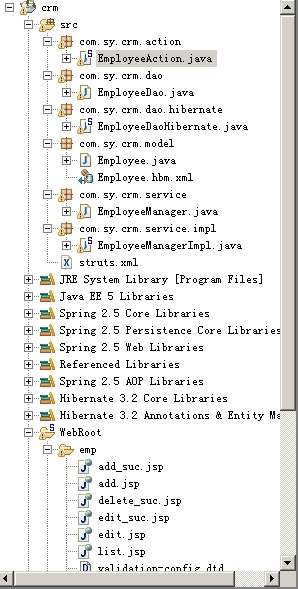
下面是项目的构图:
第一点注意的是,搭建出项目,一定会报错,因为Spring 2.5 AOP Libraries中的asm的三个jar包会和
Hibernate 3.2 Core Libraries中的asm的jar包中的某些类中有冲突。所以一定要删除Spring中的三个asm的jar包。
第二点要注意的是,struts2的配置包的导入,需要的是5个jar包分别是:
struts2-core-2.0.11.2.jar
freemarker-2.3.8.jar
ognl-2.6.11.jar
xwork-2.05.jar
commons-logging-1.0.4.jar
struts2+spring配置包:struts2-spring-plugin-2.0.11.2.jar
网上有些还说需要把4个spring的包拷到lib下,我是拷了但是,并不确定这样做是否有必要。
总之是正常运行了。
所以也就没想太多。如果有的朋友运行不了,可以考虑把这4个需要的包写上来。
好了就说这么多吧,有疑问的朋友可以留言。我会尽量答复。


